I get this question a lot, so I thought it would be helpful to write up a little primer on HTML and some quick instructions on how to add an image to your sidebar.
A Quick HTML Primer
HTML stands for “Hypertext Markup Language,” and is the code for most webpages that tells your web browser what to display. HTML uses “markup tags” to tell the browser what to do. Tags are indicated by angle brackets. Most tags are “wrappers,” which means there’s an opening tag and a closing tag, with something in between that they’re modifying or acting upon (they can also be called “start” and “end” tags, if you prefer).
For example, if you want to make something bold, you can use the <b> tag. That tells the browser to make the text after that tag bold. You then use the </b> tag to tell it to stop bolding. (The forward slash is the part that indicates it’s a closing tag).
Some tags, like <b> are very simple and have no options (it’s either bold or not). Other tags allow you to set various attributes for them, such as the location of a file or height of an image. When you set an attribute, it’s indicated within the opening tag. The structure for an attribute is simply: attribute=”details”. You use a specific attribute code, an equals sign, and then enclose the details of the parameter within quotation marks.
The Image Tag
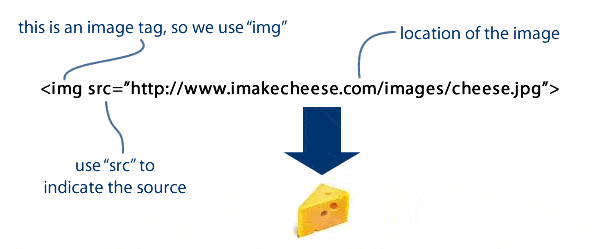
The image <img> tag doesn’t require a closing tag. It starts with “img”, and then you simply specify the location using the “src” (source) of the image to be displayed, which is the web address of the location of the image file.
The Anchor Tag
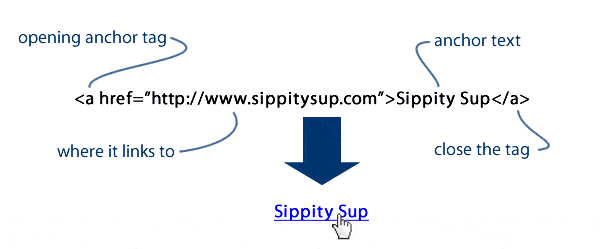
In many cases, you’re probably going to want to make the image link to something else. To do this, we use the anchor tag (also called a “link” tag). It’s indicated simply by an <a>, and the “href” parameter tells the browser where the link goes.
Combining the Anchor and Image Tags
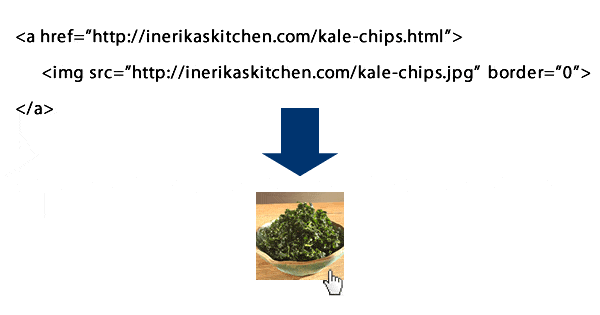
The anchor tag can wrap around more than just text; you can wrap it around an image. When you do that, the image becomes the clickable link. Important to note that some browsers will add an ugly blue border around the entire image when it’s clickable, so you’ll want to tell the browser explicitly not to display the border (unless that’s what you’re into, of course).
In this example I’ve put each tag on a separate line, which is fine because HTML doesn’t care about line-breaks.
A Few Other Attributes
Strictly speaking, the code above will work just fine, but there are a few other attributes that are helpful to know about before we continue.
It’s always a good idea to specify the height and width of an image. That tells the browser, before it even loads the image, what size image it should expect. This helps speed up page load times, and keeps the page from shifting around as everything loads into place. Although you can use the height and width attributes to get the image to display at a size other than it’s actual size, this is not a good idea. When the browser resizes an image, it’s not going to do as good a job as your image editing program (like Photoshop), so it may look a little fuzzy. And if you tell it to display larger than the actual size, then it’s definitely going to look fuzzy. Equally important, if you’re having your readers download large images and then using the browser to scale them down, it takes extra time to download all that unnecessary data.
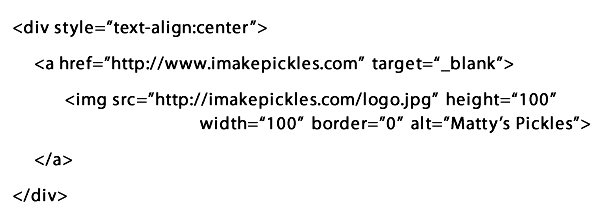
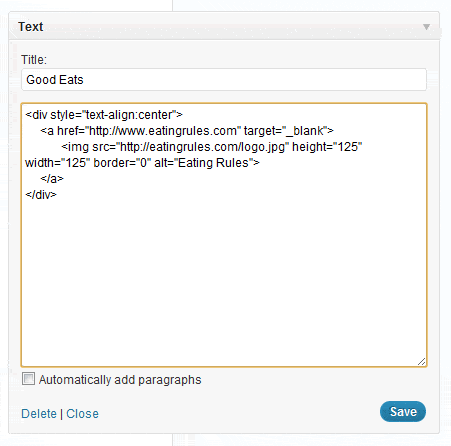
If you’d like to center the image within the sidebar, you can use a little bit of style code to make that happen. The best practice for doing this is to use a “div” tag and then apply some styling to it: <div style=”text-align:center”> will do the trick.
It’s also a good idea to use an “alt” tag, which specifies alternate text, should the image not be displayed — and it also lets search engines know what that image is about. (It’s not a huge factor in search engine optimization, but it helps.)
Finally, if you’d like the link to open a new browser window, you can specify target=”_blank” (note the underscore, that’s not a typo). Most browsers will respect that, and open a new window when the link is clicked. Note that you should use target=”_blank” sparingly — you don’t want most links on your site to open new windows!
Upload Your Image
So you’ve got an image file you’d like to display. Before you can set up the code, you’ll need to know the location of the image file. If the image is on someone else’s server, you should have permission before linking to it directly (“hotlinking”) — otherwise you’re stealing their bandwidth. (Additionally, if they ever move the image you’ll be stuck with a broken link!).
A better practice is to take the image and upload it to somewhere else you control. That can be your blog itself, or a free image hosting service, like Flickr.
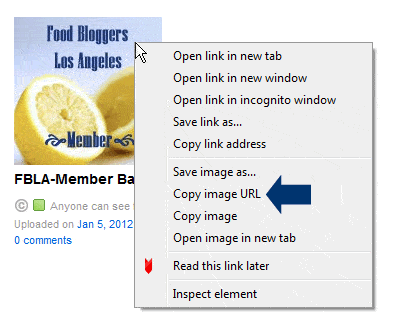
If you use Flickr, once you’ve uploaded the file to that service and are viewing it, you can right-click on it and then open the image in a new window. From there, you’ll see the URL (at the top) of the image location. (Your browser may also let you “Copy Image URL,” which copies the location it to the clipboard, saving you a step.
If you want host the image on your own site:
For WordPress, go to your dashboard and then select Media –> Add New. Once you upload the file (just as you would when adding an image to a post), WordPress should show you the file location.
On Blogger, there is no image upload tool unless you’re writing a post. So the quick way to do it is to create a draft of a post, upload an image, and then preview the post (you don’t have to publish it). That will get the image onto Google’s servers.
Putting it All Together
Depending on which blogging software you use, the way to get the code onto the page varies a little bit, but the basic idea is the same: Create a “widget” or “gadget” for your sidebar and plunk the code into it.
For WordPress, go to your dashboard and then select Appearance –>Widgets. Drag a “Text” widget into the sidebar area on the right, and then put the code into the larger field.
For blogger, go to Layout, then click “Add a Gadget,” and choose the “HTML/JavaScript” gadget, then put the code into the larger “Content” field.
A Few Final Tips
- The order of the attributes within a given tag does not matter, as long as you start with the specific tag code (a, img, div, etc.).
- If it’s not working, make sure you’re using straight double-quotes, not the little curly ones that some word processing programs use (it’s the regular double-quotes — this will usually only be a problem if you’re typing in Word).
- Be sure there’s a space before each attribute.
- If you want to have several images in your sidebar, you can put them all in one text box — you don’t need multiple widgets/gadgets. If you use a separate <div style=”text-align:center”> tag around each image, it will stack them nicely centered, one on top of the other. If you want a bit more vertical space between them, you can put a linebreak between each block of code, and check the “Automatically add paragraphs” option at the bottom… Or change your opening div tags to <div style=”text-align:center;margin-bottom:20px”>
And that should do it! Any questions?



oh my… I will just call you!
Haha! That works too. 🙂
I have to move this tutorial in its entirety to a calmer place, where I can study it for a few minutes (as if – just kidding, more like a few weeks:). One of my goals for this year is to learn the basics of HTML so that I can at least be somewhat literate when I approach my admin page:)
Thank you for trying to enlighten us with your knowledge. It is so nice to know that you are just around the corner:)
BTW, were your ears burning Saturday morning? It’s because Louise could not stop talking about you:)
Hi Lana! Just take your time with it, and I’m sure you’ll be just fine. I know it looks like a lot of info, but it’s really because I just ramble on too much.
I heard the San Diego meetup was great! (and thanks) 🙂
Thank you! I’ve been wanting to add my own pic to the sidebar (suggested by you) but I had no idea how to. Guess that goes on my list for this week!
Great! Hope this explains everything…let me know if you get stuck or any other questions come up!
It almost seems doable! GREG
Thank you so much! The is the exact tutorial I was looking for. One question, if I wanted to do two side by side squares instead of one under the other, how could I change this code?
Hi Kathy! Just put both images inside the main <div> tag – if they’re not too wide they’ll both sit on the same row.
So it would be something like this:
<div style="text-align:center">

 <a href="http://facebook.com"><img src="/facebook.png"></a>

 <a href="http://twitter.com"><img src="/twitter.png"></a>

</div>
If you’re WordPress, make sure not to check the “Automatically Add Paragraphs” option at the bottom of the widget.
Hi there, so I’ve tried multiple times to get my images 150×150 to sit two-by-two and it won’t do it. I have tried adjusting my sidebar width larger (currently it’s set to 320px) and I have reduced my images as small as 125×125 and nothing is working. I am fairly accustomed to working with CSS and html, but this is driving me crazy!! Any help would be appreciated. Here is my current code that I tried:
<a href=”http://www.sweetness-n-light.com/p/the-company-of-saints.html” rel=”nofollow”></a><a href=”http://www.sweetness-n-light.com/search/label/%7BSeeking%20Truth%20%26%20Beauty%7D” rel=”nofollow”></a>
Thanks for your time 🙂
Meredith
Hi Meredith,
I assume you left out the <img> tags in the above code for clarity, yes? If that’s the case, the code looks fine – unless there is some CSS styling being applied to the images that is forcing them to new lines. If there’s a “clear” in the CSS that would do it.
Also, make sure you do not have the “automatically add paragraphs” option checked.
Rght now it looks like your sidebar’s usable width is only 260 pixels, with a 15px margin on either side. So it may be that you’ve set your sidebar to 320px, but your theme isn’t actually doing that?
Hope that helps!
Thanks I got it to work 🙂
Thanks! It’s work very well 🙂
Great info, I was able to do all of it and it worked and did not take too much time. Thanks. I have a question…I want it to show up as a category text in wordpress so that I can specify what post I would like it to show up on, but it’s not showing up as a category text only as a text.. Suggestions?
Oops, sorry that was my fault…forgot to do something.. It is working now
I have managed to successfully upload the image into my sidebar but I cannot align it to the left for some reason…I tried the centre code you provided in your post but it didn’t work :/
Thanks
Hi Christobel,
If you haven’t gotten it sorted yet, feel free to reply with the code you’re using and I’ll be happy to take a look.
Thank you, Andrew! I came across your tutorial in a google search. I have been wanting to add an image to my blogger sidebar that would take you directly to my website. I hosted my image on flickr so it was a tad different but I got it figured out and is now up and running. You can see what you helped my create here: http://www.karenkaydotme.blogspot.com
It is the 3rd box down on the left sidebar. And when you click on it, it really does go to my site! Yay!
Now I am off to look at you site, eatingrules. Thanks again!
Karen
Great! So glad this was helpful for you. 🙂
Cool! Thanks for the clear tutorial! I’m bookmarking this!
Hi.
My question regarding adding pictures to my website is that, whenever i want to share an article on facebook, stumbleupon, google+…… instead of only the thumbnail from the post itself to show up, the pictures on my sidebar show up as well..
Is there some code i can add to the widgets containing pictures on the sidebar so that they are excluded when sharing posts to social networks?
Hi Sleem –
It’s probably easier to specifically tell the social media sites which image you want them to use (rather than trying to exclude other images). To do this, you’ll need to add the “Open Graph” tags to your site (they go in the
section) to tell the social media sites what image to use. Plugins like WordPress SEO by Yoast will do this automatically, using the “Featured Image” on the post (unless you choose a different image).Hope that helps!
I want to put an image in my sidebar that when it is clicked on the viewer will be taken to a differant website. (I know how to do the above. ). I also want to make sure that the image is not used when someone wants to share one of the post to Facebook or Twitter. Please help.
Hi Sbanicki – To go to another website, all you need to do is specify that site’s URL in the anchor tag… and if you want it to open a new window/tab, just add target=”_blank” into the anchor tag as well (including the underscore).
As for not letting the picture show up on Facebook when sharing, the best way to do that is to specify the picture you do want to show up! You can do that through the Facebook “Open Graph” tags. Plugins like WordPress SEO by Yoast can help with this.
Thanks for the great tutorial! I was able to do it in about 10 minutes (after tweaking the size of my photo to fit my sidebar). Your website is a great resource of information!
Its work.. i like it. Thank you..
Hi, I was wondering if you could help me… I have a premade template I downloaded installed and I just want to rearrange this: The image and text widget that is working as my ‘about me’ on the sidebar, I would like it placed at the begining of all the widgets that came with the template. I can rearrange the Blogger widgets if I go to ‘Design’ but can’t place them on top of the already made ones ‘Social media buttons and Contact me’ because of course they don’t show there only in the ‘Edit HTML’ I tried changing them there but was getting some errors since I don’t know much about HTML. I hope I’m explaining it right. Please guide me on how to or if there is a code to do this, thank you!Link to my blog is: https://rplidiomas.blogspot.com
Hi Ruth. I just took a quick look at your site, and I see that your “About Me” section is indeed at the top of the sidebar now… So I’m guessing you got it figured out. 🙂
Yes I did! After a lot of trial and error though, but considering that a month ago I didn’t even know what a HTML code was, I feel proud of myself for putting this site together. Thanks a lot for replying!
Great job!! 🙂
Thank you for this easy to follow tutorial. I was able to add GIF image on the sidebar of my blogger blog.
How can I make two or more images slider…
Hi Ajay – An image slider usually uses javascript so it’s a bit more complicated. I’d suggest finding a plugin to help you . Maybe this one? https://wordpress.org/plugins/bxslider-integration/
And while you’re looking for plugins, here’s some advice on how to choose good, reliable plugins:
https://www.nerdpress.net/how-to-choose-a-wordpress-plugin/
Hope that helps!
Thank you so much. For me as a beginner, it is a fantastic explanation. I tried learning it online but no one explains so clearly. You solve my problems. Thank you so much!!
But still, I want a quick tip. please tell me how can I add everyday new image quote on the sidebar with like and tweet button on WordPress self-hosted site?
How to set an ad or clickable image on the top of your blog and website through simple way – YouTube
visit
https://www.youtube.com/watch?v=byZxETGDzXU
Thank you so much
Thanks Sir
Will Work For Same Video ?
Hi Anelia – Yes, this should work similarly for video. I usually recommend uploading a video to Youtube or Vimeo, and then embedding it on your site with one of their embed codes. 🙂
Thank you. This a complete details and helpful for blogger and beginner like me.
thank u so much
Thanks For Guiding Me to Add image in Sidebar
Thank you for the info. But still have something to ask please! Can I use this same method to unable image uploader file true mobile profiles pictures? I mean uploading images true mobile profile pictures to my Blogspot? Help please!