The NerdPress Guided Agent Connector lets an AI assistant (or “agent”) work on your WordPress site: read your content, draft and edit posts, tidy up media, check settings — whatever you allow it to do. You decide what it can do, you can see everything it did, and you can undo some of it.
This page covers connecting Claude and ChatGPT to WordPress, but the steps are similar for most agents:
- Install our Agent Connector plugin on your site.
- Add a custom connector to your agent/assistant.
- Approve the connection in your own WordPress admin.
A “connector” may also be called an “MCP” or “plugin,” and an “agent” may also be called an “AI assistant.”
Not all AI plans allow custom connectors, so if you get stuck on Step 2, please let us know.
Step 1 — Install the Agent Connector plugin
- Download the plugin: NerdPress Guided Agent Connector (.zip)
- In your WordPress Admin, go to Plugins → Add New Plugin → Upload Plugin.
- Choose the .zip file, click Install Now, then Activate Plugin.
From that point on the plugin can be updated the same way your other plugins are.
Step 2 — Add your site as a custom connector in your assistant
These steps may vary depending on which AI agent you’re using, but the overall idea is the same on all of them: you’ll add a custom “Connector” or “MCP” or “Plugin” and click through to authorize the connection.
You’ll need the connector address, customized with your domain. 👇
👉 Replace example.com with your site’s domain:
https://support-mcp.nerdpress.net/mcp/example.comFollow the instructions for your agent:
Claude
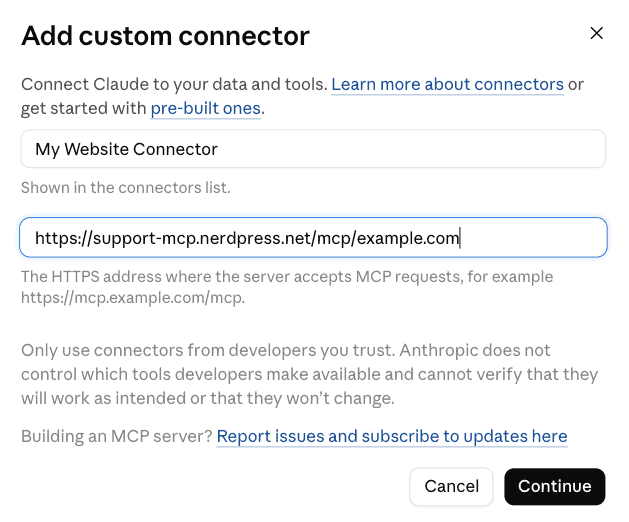
- Open Settings → Connectors (or Customize → Connectors).
- Click Add → Add custom connector (on Team and Enterprise plans, an owner needs to add it).
- Give it a name you’ll recognize — something like “My WordPress site, via NerdPress”.
- Paste the connector address, remembering to customize it with your domain:
https://support-mcp.nerdpress.net/mcp/example.com - Leave any advanced fields empty or at their defaults. Click Add.
- Click Connect.
In a new chat, use the + button in the message box → Connectors to make sure your site is switched on for that conversation.
ChatGPT
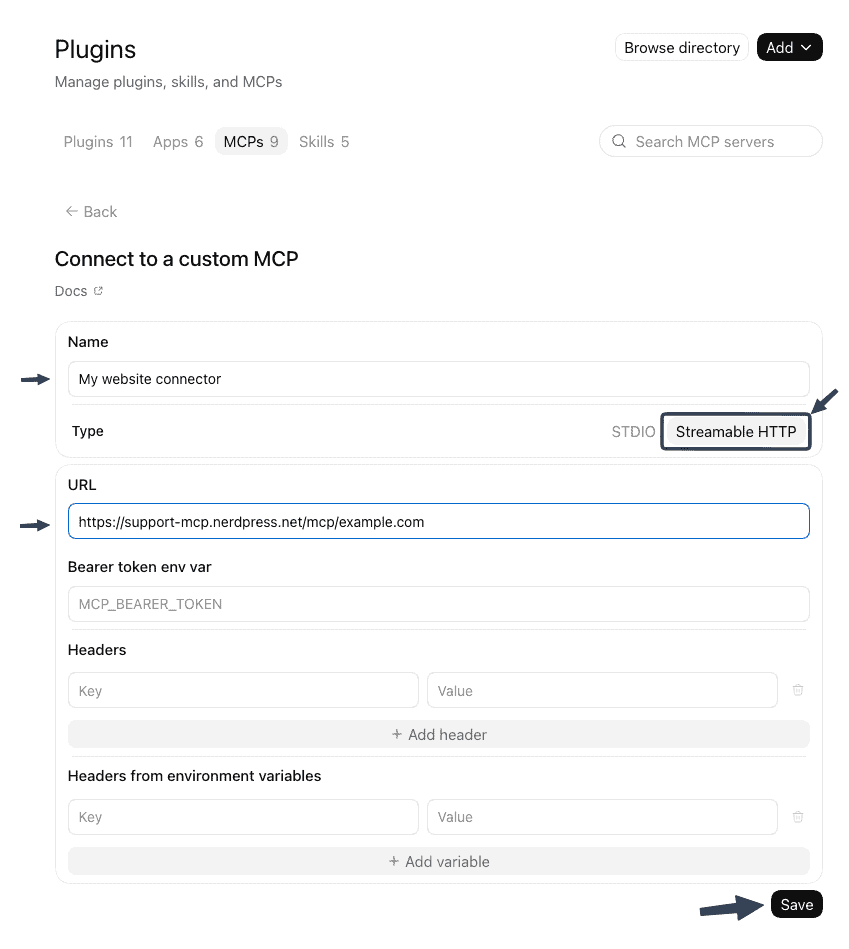
- Turn on developer mode: Settings → Security and login, and toggle Developer mode on.
(Depending on your account it may live under Settings → Security and login, or, on a Business or Enterprise workspace, under Workspace settings → Permissions & roles.) - Go to Settings → Plugins and create a new MCP connector.
Exactly where this lives in your settings may depend on whether you’re on the website or in the apps.- Name — your site’s name.
- Description — something like “My WordPress site, via NerdPress”.
- MCP server URL — the connector address, remembering to customize it with your domain:
https://support-mcp.nerdpress.net/mcp/example.com - Authentication — OAuth
- Save it.
In a new chat, pick the connector as a source, and say which site you want worked on.
Use these Hubbub Pro Action Buttons to connect your agent:
Once connected, your AI agent can help you configure your Hubbub Pro Action Buttons. Oh, the serendipitous alignment!
Or give your agent this prompt and it will walk you through the setup:
I want to connect my WordPress site to the NerdPress Guided Agent Connector, which is a remote MCP server. First, ask me for my website's domain. Take just the bare domain (no https://, no trailing slash) and put it into this URL in place of example.com: https://support-mcp.nerdpress.net/mcp/example.com Then show me the finished URL and give me step-by-step instructions for adding it as a custom connector in the app I'm using right now. Ask me which app and plan I'm on if you're not sure. Tell me what to expect when I sign in to approve the connection. Don't try to connect it yourself.Step 3 — Approve the connection on your site
Adding the connector, clicking Connect, or starting a new chat should start an approval process that requires you to sign in.
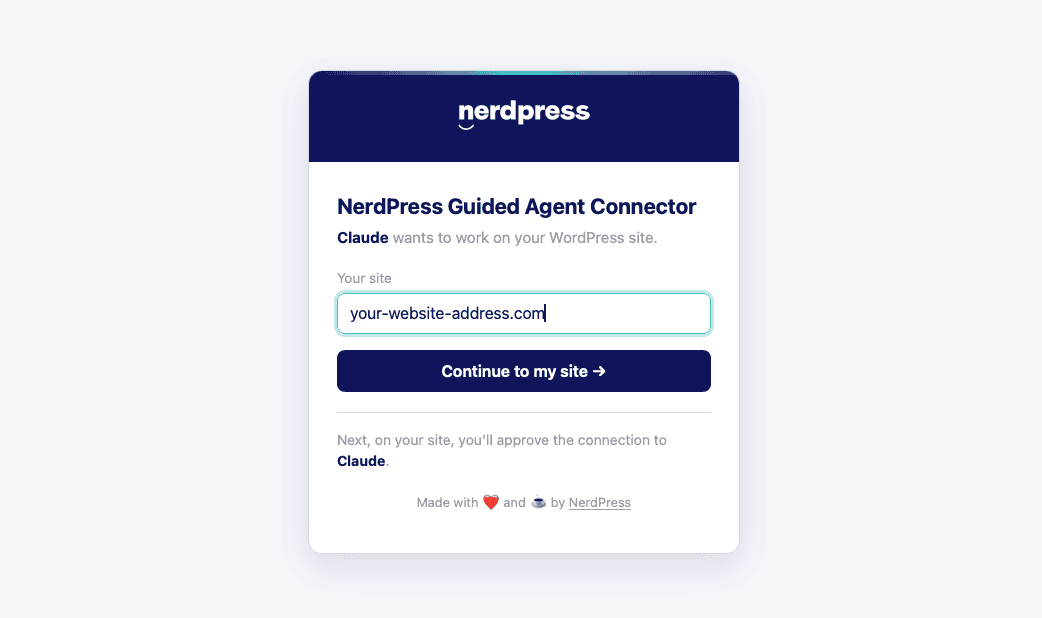
A NerdPress page opens in your browser with your domain already filled in. Confirm your domain is correct, then click Continue to my site.
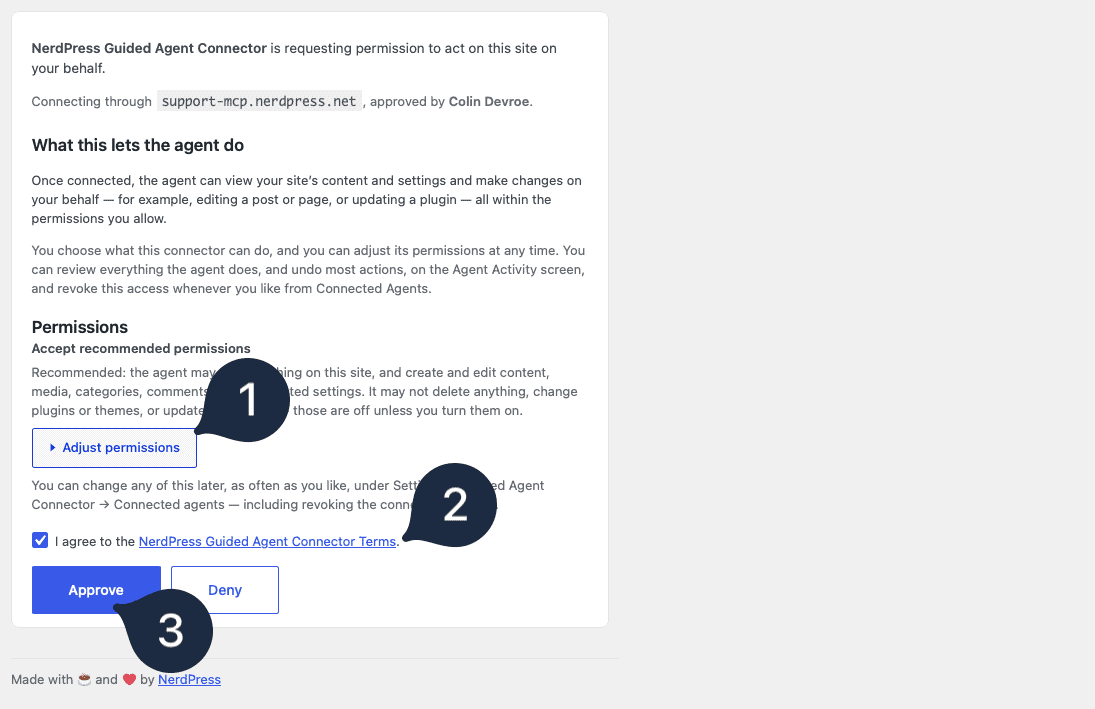
- You’ll be redirected back to your site, to a page titled Authorize NerdPress Guided Agent Connector. From there you can choose what the assistant may do. The recommended permissions are already chosen for you: it can read your site and edit some of its content, and it cannot delete things, activate or deactivate plugins, switch themes, or update WordPress. Open Adjust permissions to change any of that.
- Check the box to agree to the connector terms.
- Click Approve to finish.
(The assistant never gets your WordPress username, and this doesn’t use application passwords.)
You can always adjust a connection’s permissions at Settings → Guided Agent Connector.
Step 4 — Check your connection
Ask your agent for something harmless and specific, like “What WordPress version is my site domain-name.com running?” or “List my five most recent posts.” If you get real answers about your site, you’re connected. We’re happy to confirm it from our side too — just ask!
One quick note: If you already have other connectors set up for your WordPress site, you may want to disable them while you’re using the NerdPress Guided Agent Connector, to avoid confusing your assistant. If you’ve created any Skills that reference those connectors, they may also need to be updated to reference this new connector instead.
Examples of what you can do
You can ask an agent to do just about anything with your website. Here are a few prompts you can use to test your connection:
- “Create a list of my blog posts on domain-name.com that are missing vital SEO information”
- “Does my latest blog post on domain-name.com have good Alt text for images?”
- “Are there any opportunities for better internal post links on my last 3 published blog posts on domain-name.com?”
Tip: Unless you have multiple sites connected through the Agent Connector, you won’t need to reference your domain name over and over. After a few times your agent will remember.
Managing the connection afterwards
Everything lives under Settings → Guided Agent Connector in your WordPress Admin:
- Connected agents — every assistant you’ve connected, what each one is allowed to do, and a Disconnect button.
- Agent Activity — every change an agent made, what it was asked to do, who authorized the connection, and Undo where the change can be reversed.
Some changes are held for your approval before they happen. When that occurs, the assistant is told it’s waiting and will give you a link to an approval page.
Connecting more than one site or more than one assistant
Add one connector per site, each with that site’s domain in the URL, and give them names you can tell apart.
Each assistant you connect gets its own connection and its own approval, so Claude and ChatGPT are recorded separately in your activity log and can be revoked one at a time. It’s very likely that you’ll end up with multiple connections as AI agents and MCP connections become more popular.
Questions? Want us to set this up for you? Email support@nerdpress.net.